
The free Crypto Payment Gateway with Instant Payouts plugin adds crypto checkout to WooCommerce. Customers pay in the coin they choose; every payment is forwarded to your own wallet as soon as it's confirmed. No account, no API key, no KYC. Fees: 1% plus blockchain fees.
Requirements
- WordPress 5.8+ and WooCommerce 5.8+, PHP 7.2+ with the
opensslextension. - Your site can make outbound HTTPS requests (the coin list loads live).
- WordPress at the domain root with Permalinks set to anything except "Plain" (the live payment status uses
/wp-json/). - A self-custodial wallet address for each network you accept.
Step 1: Install the plugin
In WordPress, go to Plugins › Add Plugin, search for Crypto Payment Gateway with Instant Payouts, click Install Now, then Activate.
Step 2: Choose a mode
Under WooCommerce › Settings › Payments you get two methods. Enable one or both:
| Method | How customers pay | Best for |
|---|---|---|
| Individual Coin Crypto Payment Gateway | They pick a coin at checkout and pay a QR code on your own site | Shops that want everything on their domain |
| Multicoin Crypto Payment Gateway | They go to the hosted multi-coin page and pick any coin you enabled | Offering many coins with one setting per network |
Step 3: Enter your payout wallets
For Multicoin, fill one field per network. Leave fields empty to disable those networks.
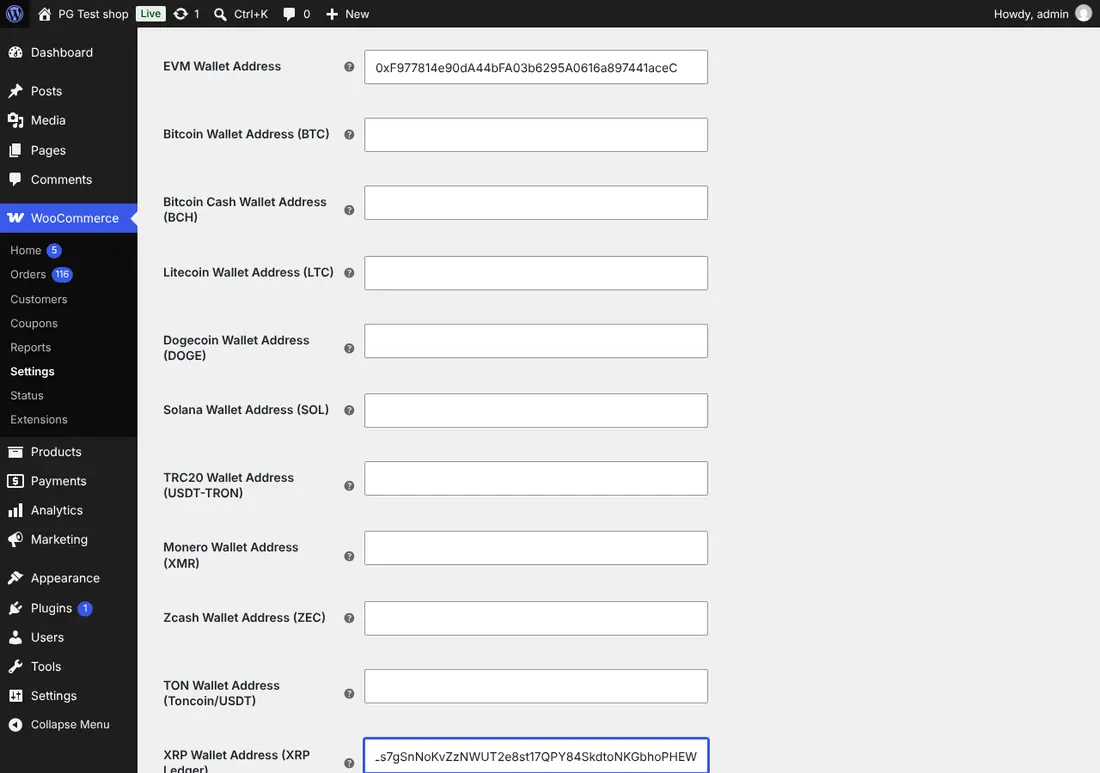
| Field | Coins | Wallet guide |
|---|---|---|
| EVM Wallet Address | ETH, USDT, USDC and 80+ tokens on EVM networks | MetaMask |
| Bitcoin Wallet Address (BTC) | BTC | Electrum |
| Bitcoin Cash, Litecoin and Dogecoin Wallet Address | BCH, LTC, DOGE | Trust Wallet |
| Solana Wallet Address (SOL) | SOL, USDC, USDT… on Solana | Solana address |
| TRC20 Wallet Address (USDT-TRON) | USDT, TRX on TRON | USDT TRC20 |
| Monero Wallet Address (XMR) | XMR | Monero on WooCommerce |
| Zcash Wallet Address (ZEC) | ZEC | Trust Wallet, OKX Web3 Wallet |
| TON Wallet Address (Toncoin/USDT) | GRAM, USDT on TON | Trust Wallet |
| XRP Wallet Address (XRP Ledger) | XRP | XRP on WooCommerce |
For Individual Coin, tick each coin in Accepted Coins and paste its wallet: a coin needs both the tick and a wallet.
Step 4: Optional settings
| Setting | What it does |
|---|---|
| Customer Pays Blockchain Fees | Adds the estimated network fee to the amount the customer sends |
| Underpaid Tolerance | Accepts payments slightly below the total (0 to 10%, default 1%) |
| Custom API Domain | Your free dedicated API endpoint or white-label domain |
| Custom Domain, logo, colours (Multicoin) | Brand the hosted page |
Step 5: Test an order
Place a small order with a low-minimum coin (USDT on Polygon or BNB Smart Chain, for example). After confirmation the order moves to Processing (or Completed for virtual products), and the order notes show the amount and transaction ID.
Order statuses
| Status | Meaning |
|---|---|
| Pending payment | Waiting for the crypto payment |
| Processing / Completed | The full amount was received and forwarded to your wallet |
| Failed | Less than the required amount arrived; a note shows the amounts |
Troubleshooting
- The method doesn't show at checkout: at least one coin needs a tick and a wallet (Multicoin: at least one wallet).
- "Error checking payment status" on the QR page: set Permalinks to anything except "Plain".
- Order stays Pending after payment: make sure nothing blocks or caches
/wp-json/. See WooCommerce troubleshooting.
Coin guides for WooCommerce
- Monero (XMR) on WooCommerce
- XRP on WooCommerce
- Bitcoin, USDT, USDC, Solana, Ethereum, Litecoin, Dogecoin
Frequently asked questions
Can I use both modes at the same time?
Yes. Customers then see both methods at checkout. Many shops use Multicoin alone for simplicity.
Does it work with the block checkout?
Yes, the plugin supports both the classic and the block-based checkout.
Do customers need an account anywhere?
No. They pay from any wallet. Neither you nor they register with PayGate.to.